Introduction
Understanding CSS
CSS stands for (Cascading Style Sheets) and controls the visual presentation of your website’s content. Dipping your toes into CSS to styling and editing your HTML elements may feel hard, and yes, it is if you are starting to code, but it opens up possibilities for tweaking your site’s aesthetics the way you want. If you’re eager to dive deeper into styling or want more control over your site’s look and feel, custom CSS knowledge is the way to go. With custom CSS, you can play with various aspects of styles, such as:
- Typography
- Colours
- Layout
- Spacing and Alignment
- Borders and Backgrounds
- Animations and Transitions
- Flexbox and Grid
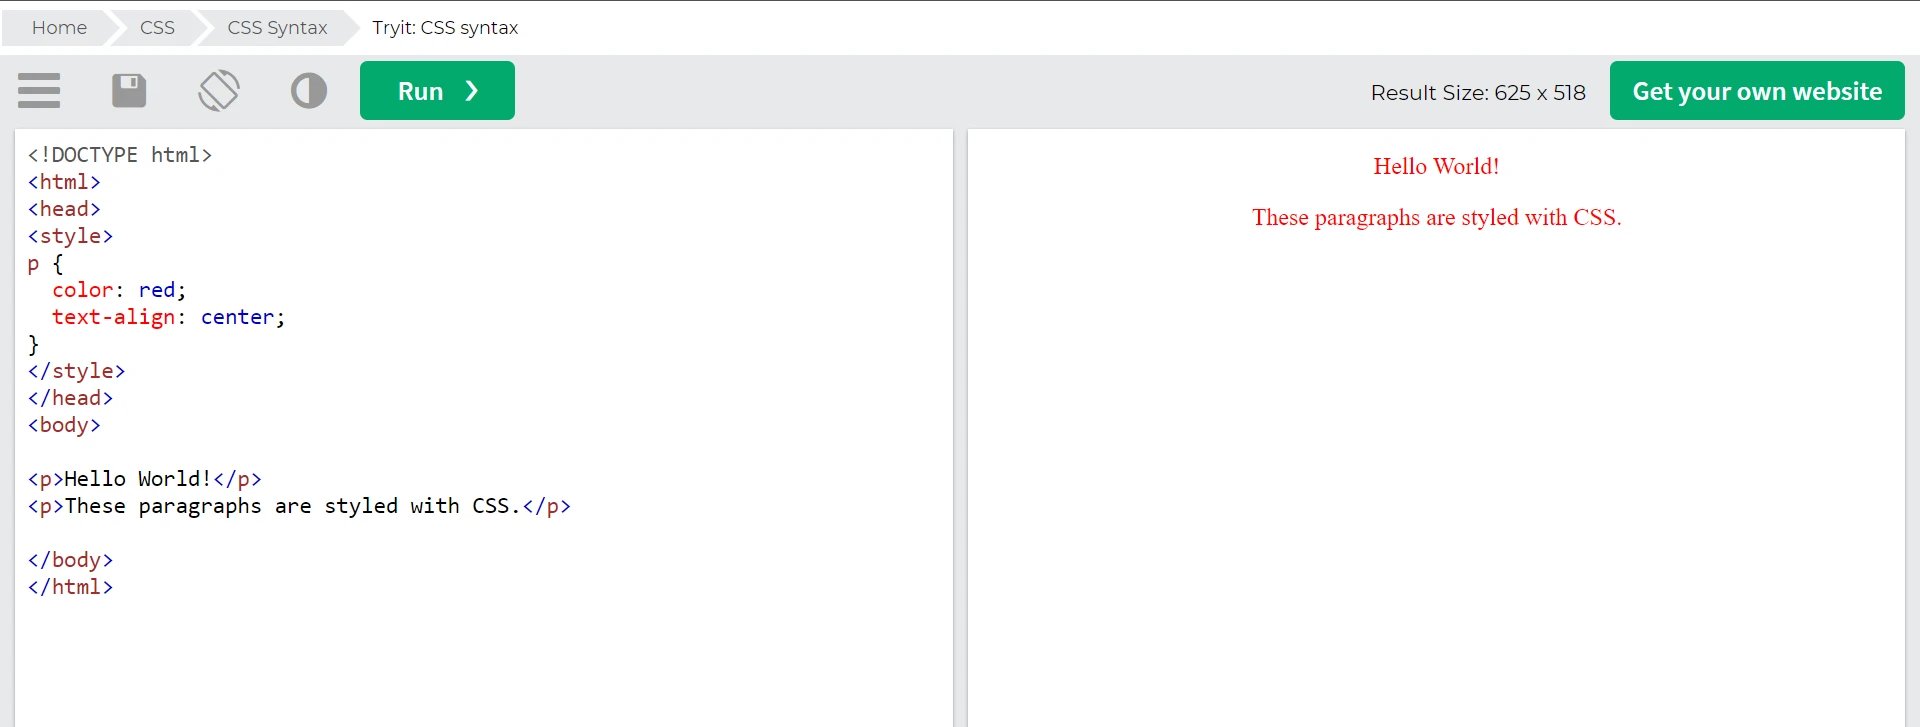
Here is an example of what CSS looks like
CSS in the Context of WordPress
CSS is essential for a WordPress website. WordPress allows you to add custom CSS to the default styles of your WordPress themes and plugins to ensure they align with your brand style and standards. In this article, we will see how we can add custom CSS to your WordPress site.
Ways to add Custom CSS to your WordPress theme
Now that you understand CSS and how WordPress uses it let’s look at the option to add custom CSS to your WordPress website. There are two main ways to add custom CSS. You can follow one of these two options.
Add custom CSS using WordPress Customiser
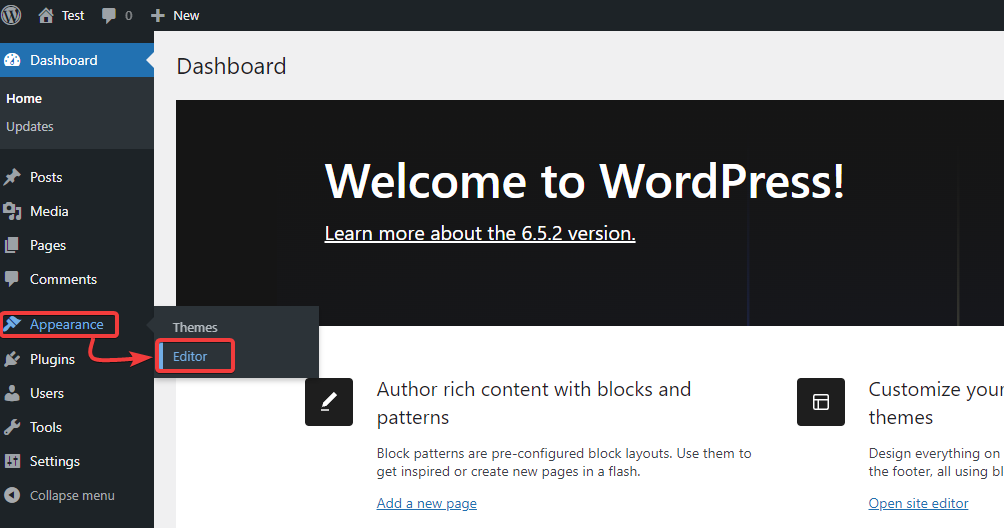
First, ensure you have the website’s admin login information and are logged in to the WordPress Dashboard. Now go to Appearance and then Editor.
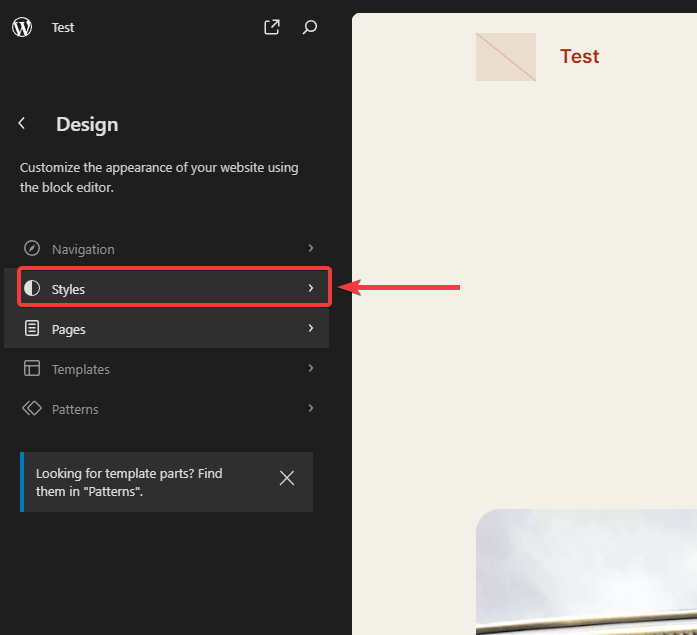
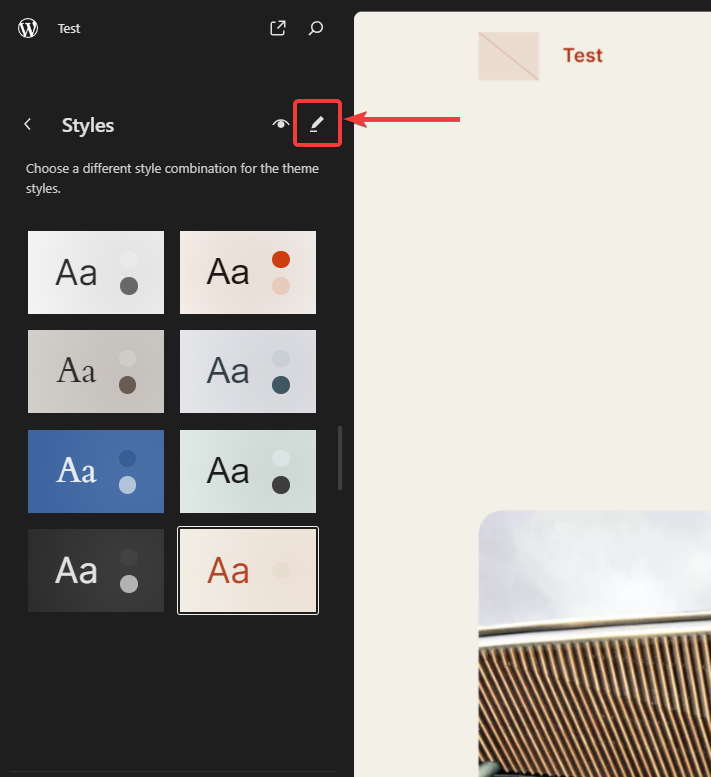
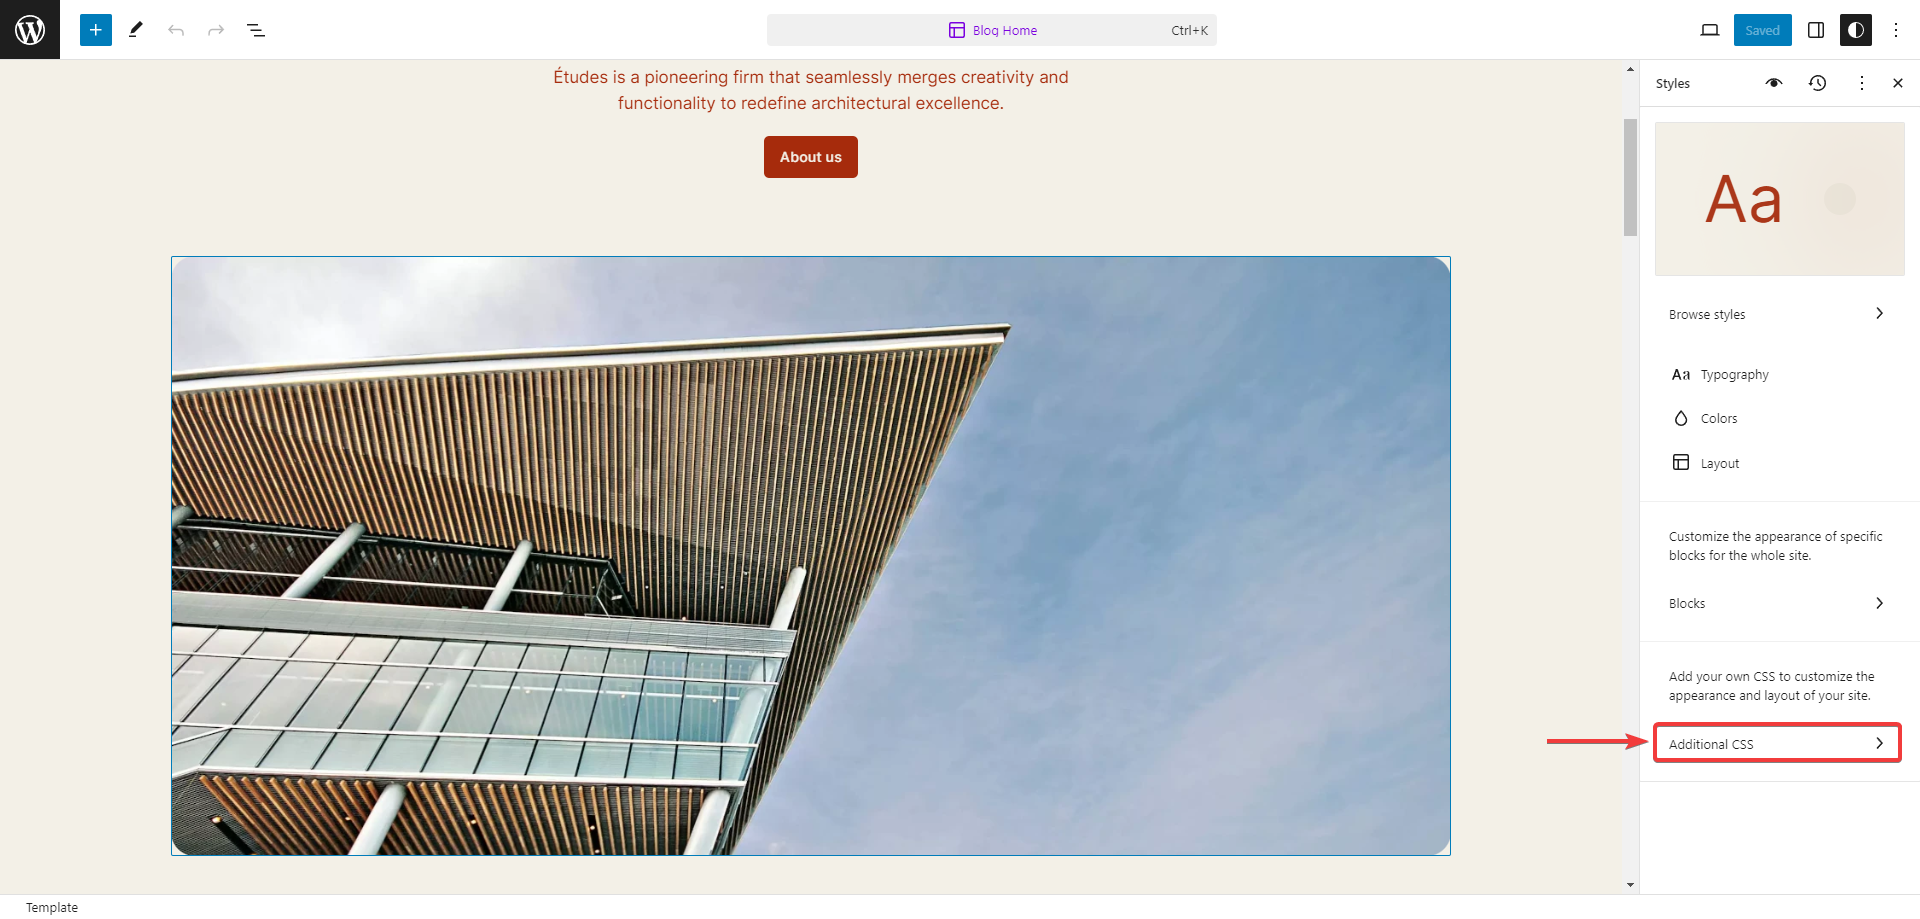
After clicking, you should see the WordPress Customiser option on your website. Now click on the Styles option and click on the Edit Styles button.
After clicking, you should see a tab on the left side where you can access additional CSS options.
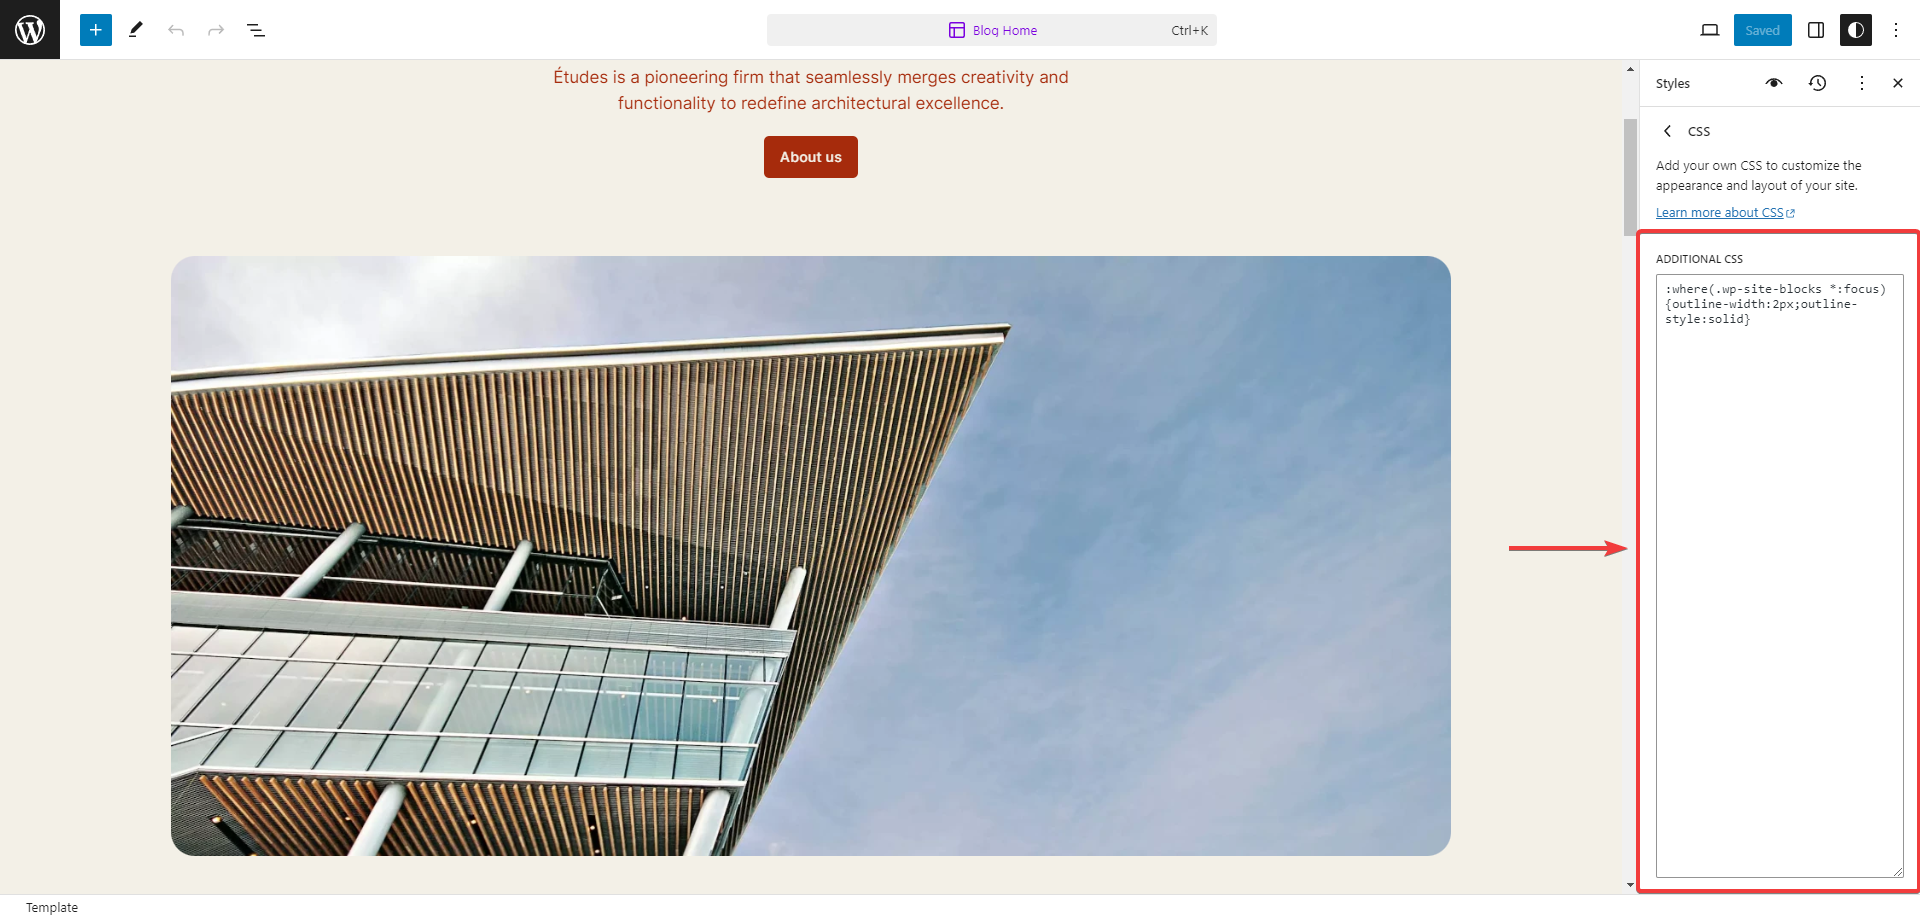
Now, you should see a box for adding custom CSS.
Add custom CSS using a plugin
You can also use some free or paid plugins to add custom CSS to your WordPress site. You might want to use a plugin to add CSS to WordPress for a few reasons. Plugins let you add custom CSS without having to modify your WordPress themes or the plugin’s original CSS file. Plugins are used to get some additional features, such as
- Greater Customiser Support with live preview
- Helpful code syntax highlighter with error-checking
- No additional configuration is required
- Tracking CSS updates
- Good looking UI
In this article, we will use some free plugins for adding custom CSS to your website.
Simple Custom CSS and JS
This free plugin lets you add custom CSS and custom JS to control your website’s appearance. It also lets you add custom CSS in separate files and organise your CSS codes properly. First, you must download and install the plugin from here.
To learn how to install the plugin on your WordPress site, you can follow this installation guide.
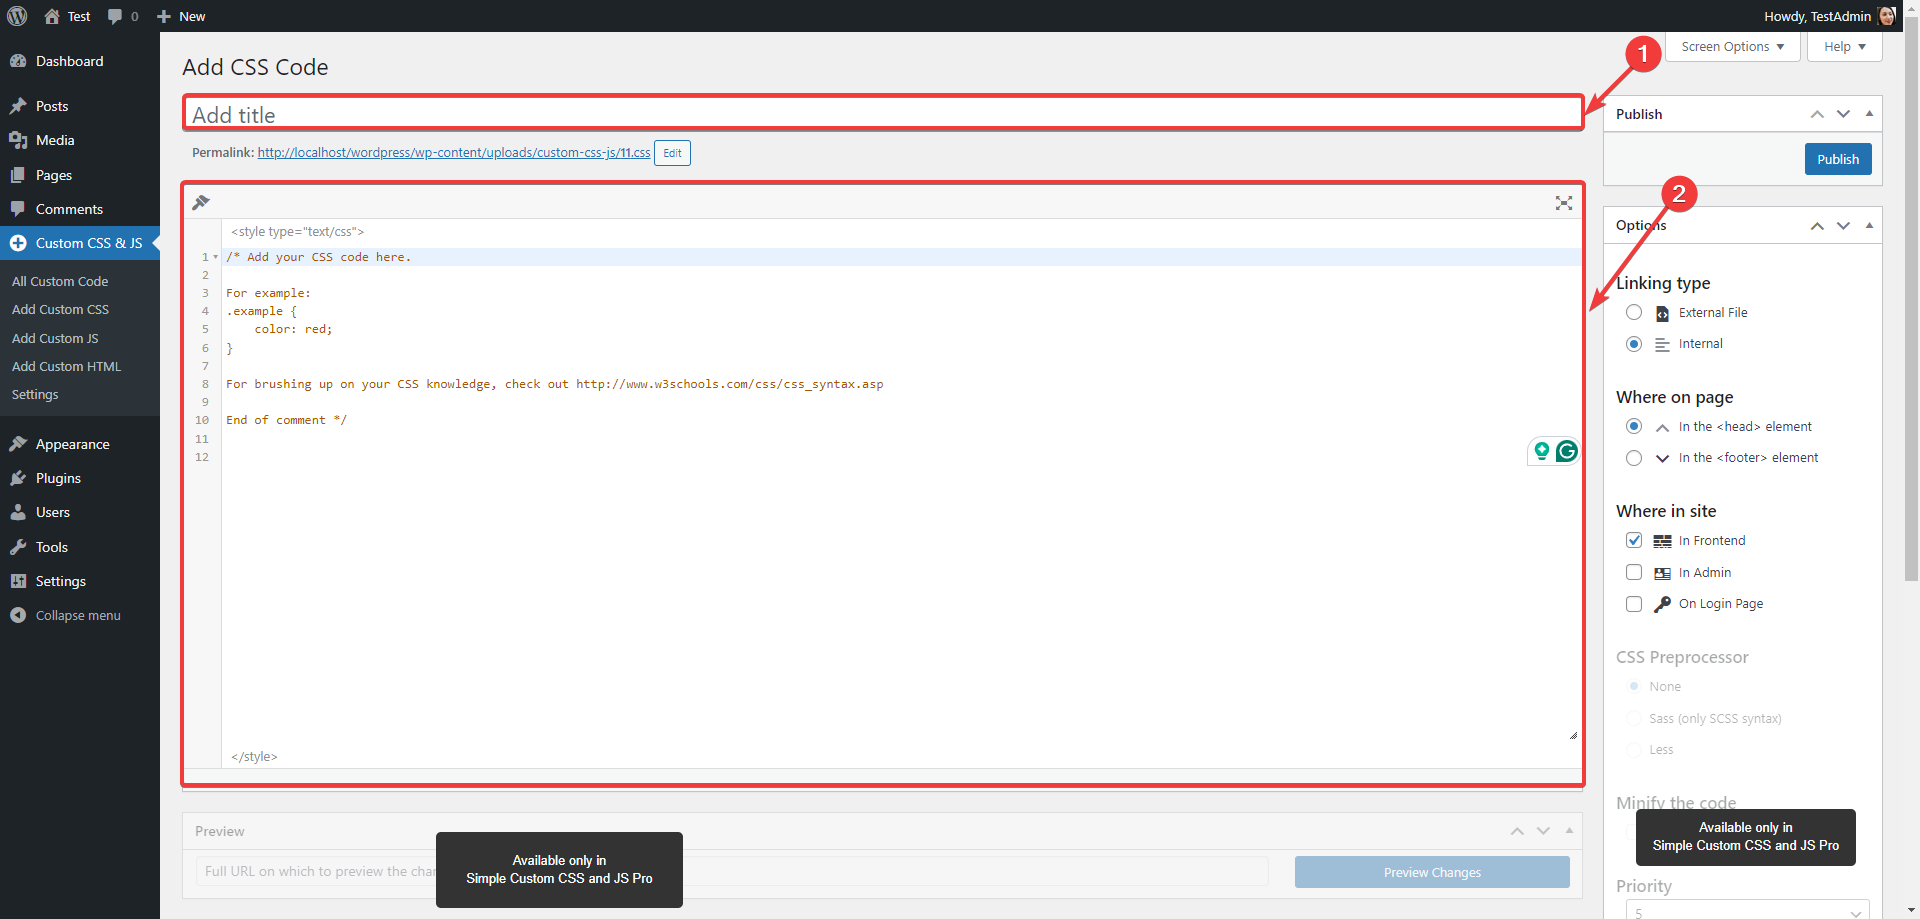
After installing it, you should be able to see a new option in the WordPress dashboard sidebar called Custom CSS & JS. Now click on the option, and you should see a new window where you can add custom code by clicking on the Add CSS Code button.

After clicking, you should see a new window where you can add the Name[1] for the custom CSS and a Blank Box[2] for adding custom CSS codes and editing CSS codes.
FluentSnippets – The High-Performance file based Custom Code Snippet Plugin
This is also a free plugin that lets you add custom CSS styles to your HTML elements. It allows you to add high-performance code snippets to your WordPress site. You can also add custom PHP(Hypertext Preprocessor) and Javascript codes.
To start first, you can download and install the plugin from here.
To install, just go to Plugins > Add New Plugin and search for FluentSnippets. now click install and activate the plugin.


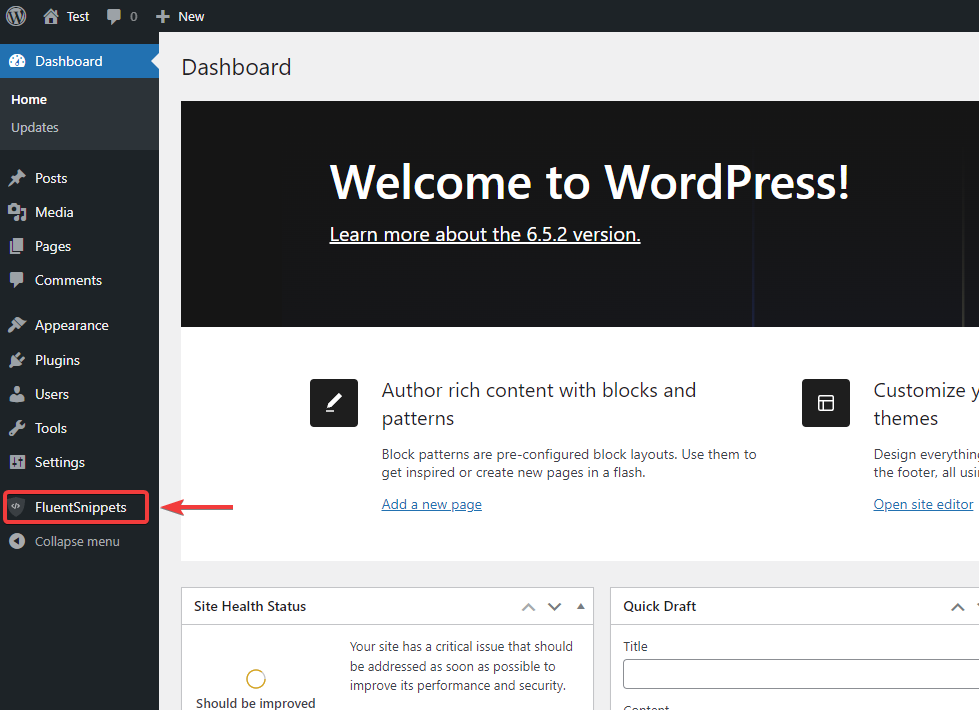
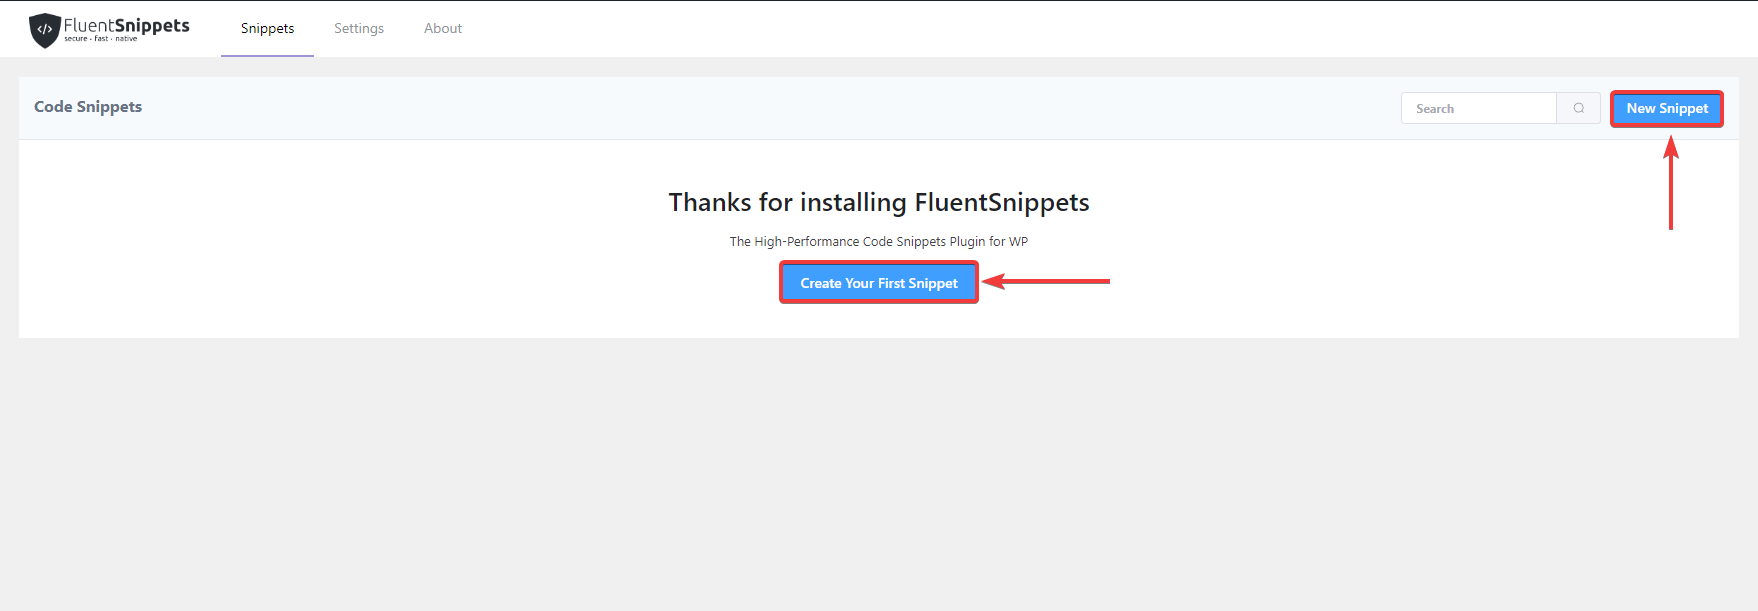
After installing it, you should see a new option called FluentSnippets in the WordPress dashboard sidebar. Now click on the FluentSnippets tab.
After clicking, you should see a new window where you can add custom CSS code by clicking the Create Your First Snippet or New Snippet button.
After clicking, you should see a new window where you can add the Snippet Name[1] for the custom CSS, select the snippet type[2], and a Blank Box[3] for adding custom CSS code and for CSS editing.
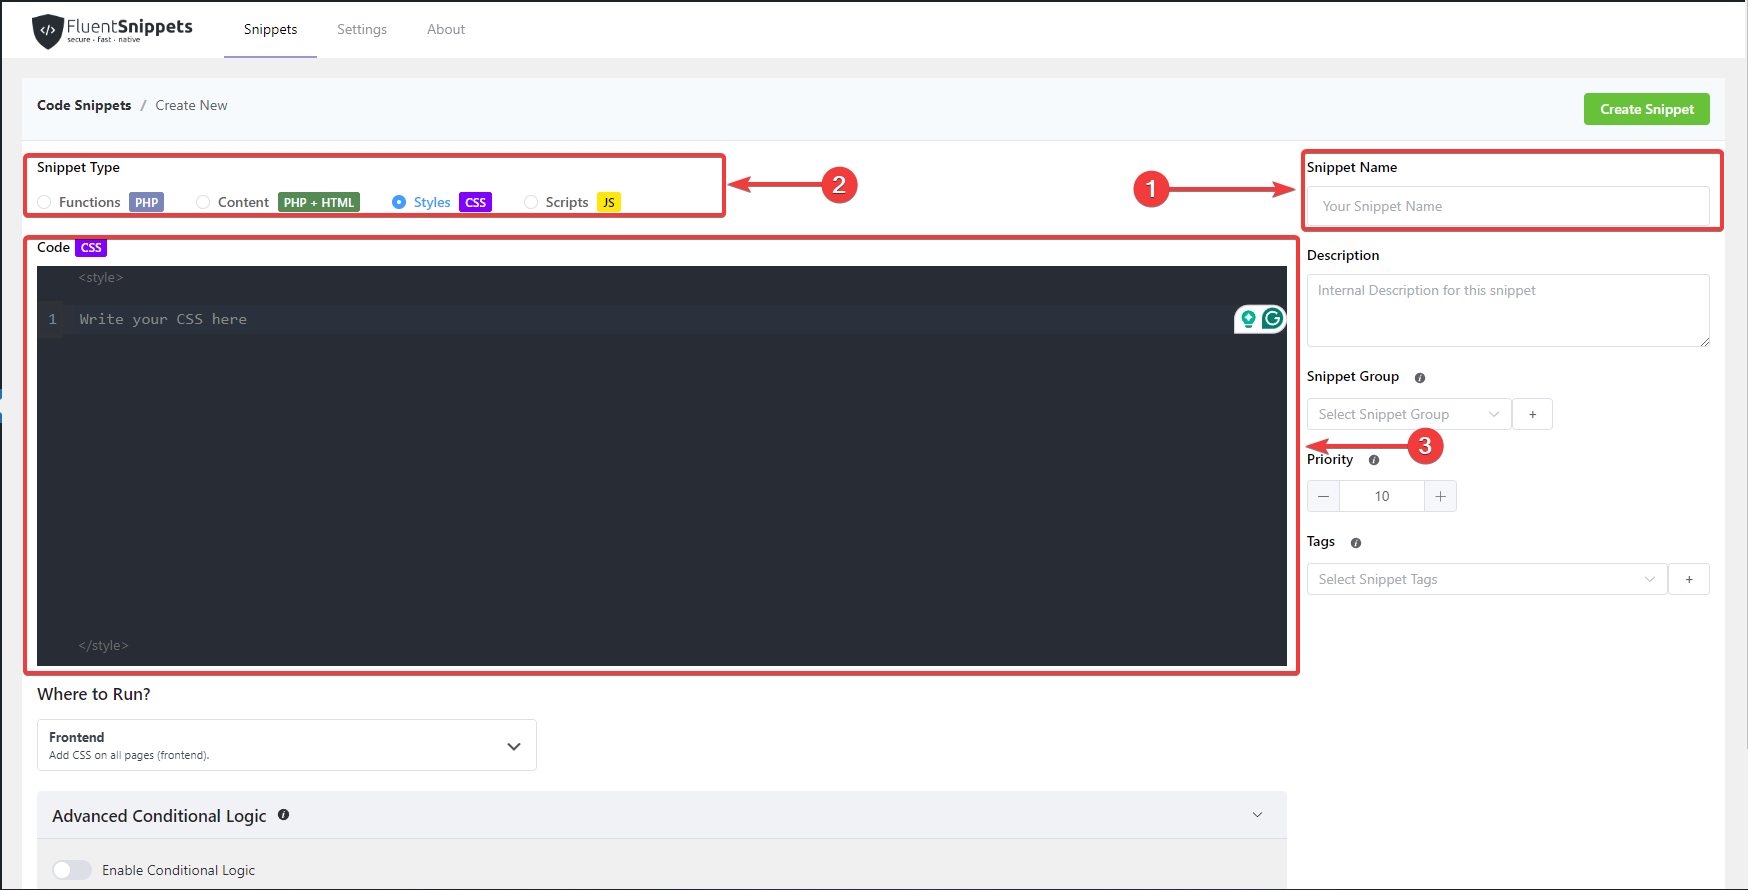
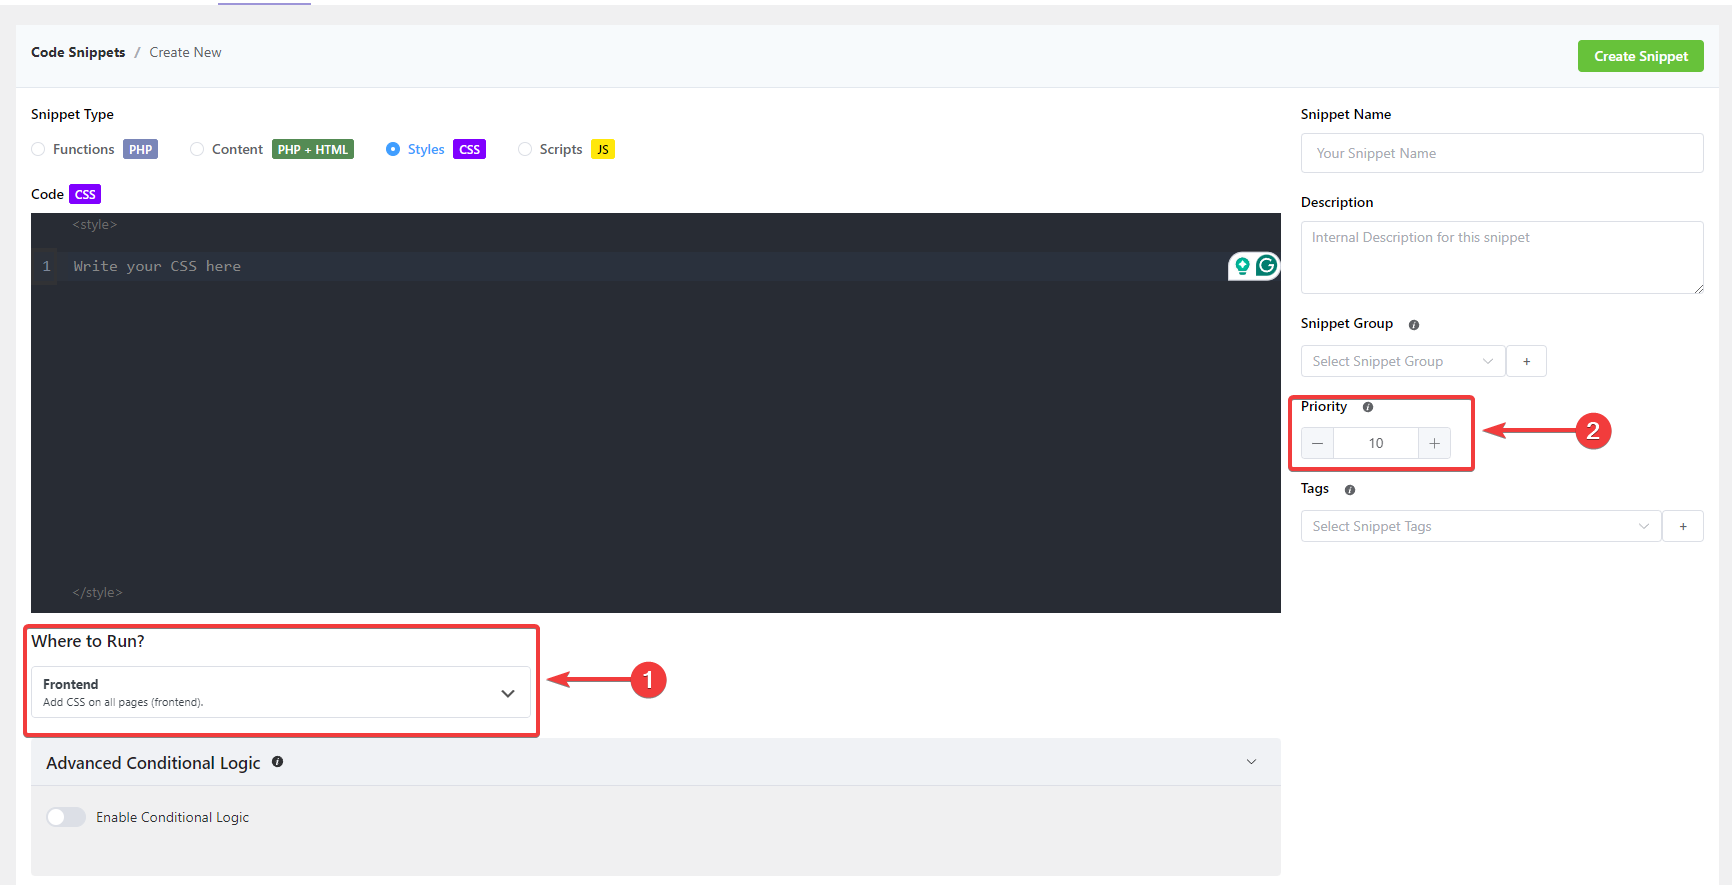
With this plugin, you can even select where the code you want to run and the Priority of that snippet.
Basic customisations in your WordPress site using custom CSS
You can do basic customisation on your WordPress site using custom CSS. Here are some examples:
1. Changing Font Styles
Adjust the font family, size, weight, and color of text elements such as headings, paragraphs, and links.
Change font family for paragraphs
p {
    font-family: Arial, sans-serif;
}
Increase font size for headings
h1, h2, h3 {
    font-size: 24px;
}
Change the color of links
a {
    color: #0066cc;
}
2. Adjusting Backgrounds and Colors:
Modify background colors, add gradients, or customise background images for different sections of your site.
Change the background color of the header
.site-header {
    background-color: #f0f0f0;
}
Add gradient background to footer
.site-footer {
    background: linear-gradient(to bottom, #ffffff, #f0f0f0);
}
3. Styling Buttons
You can customise the appearance of buttons by changing their colors, sizes, borders, and hover effects.
Change button background color and text color
.button {
	background-color: #ff6600;

    color: #ffffff;

    border: none;

    padding: 10px 20px;

}
Add hover effect
.button:hover {
	background-color: #ff9900;
}
4. Adjusting Spacing and Margins
Fine-tune spacing between elements, adjust margins and control padding to improve layout and readability.
Increase spacing between paragraphs
p {
    margin-bottom: 20px;
}
Add padding to the main content area
.main-content {
    padding: 20px;
}
4.Customising Header and Footer:
Modify the appearance of the site header and footer, including logo size, navigation styles, and footer widget layout.
Adjust the logo size in the header
.site-logo img {
    width: 150px;
    height: auto;
}
Change the color of navigation links
.nav-menu a {
    color: #333333;
}
Center align footer widget content
.footer-widgets {
    text-align: center;
}
You can learn more about CSS and its properties from here.
Common reasons for Custom CSS not working in WordPress
After adding custom CSS code using the method we described, it might be frustrating to see it not working. There are so many things that could go wrong with adding custom CSS. Several reasons could cause custom CSS not to work on your WordPress site, including
- Specificity: The specificity of your custom CSS rules is lower than that of existing CSS rules. Your custom styles may not be applied to the default styles. Make sure you are properly addressing the CSS selector to target the element you want to style.
- Caching: Your WordPress site may have caching enabled; if it does, your custom CSS may not be immediately reflected on the live site. Clear your browsers and the website’s cache to see if your changes take effect.
- Syntax Errors: Syntax plays a very important role in CSS code. Even a small error could cause your custom CSS not to work at all. Double-check your CSS code for typos, missing semicolons, or other syntax errors.
- CSS Precedence: Your WordPress site’s themes or plugins may have inline styles or use important declarations in their CSS by default, which can override your custom styles. Try using more specific selectors or adding !important declarations to your custom CSS rules as a last resort.
- Plugin Conflicts: Conflicts between plugins or between your theme and child the
me can cause custom CSS not to work as expected. Try deactivating plugins one by one to identify which ones are causing the issue.
If after troubleshooting the common issues your custom CSS is still not working as expected on your WordPress site, it might be time to seek assistance from a WordPress developer. They can dive deeper into your site’s setup, identify any underlying issues, and implement solutions tailored to your specific needs
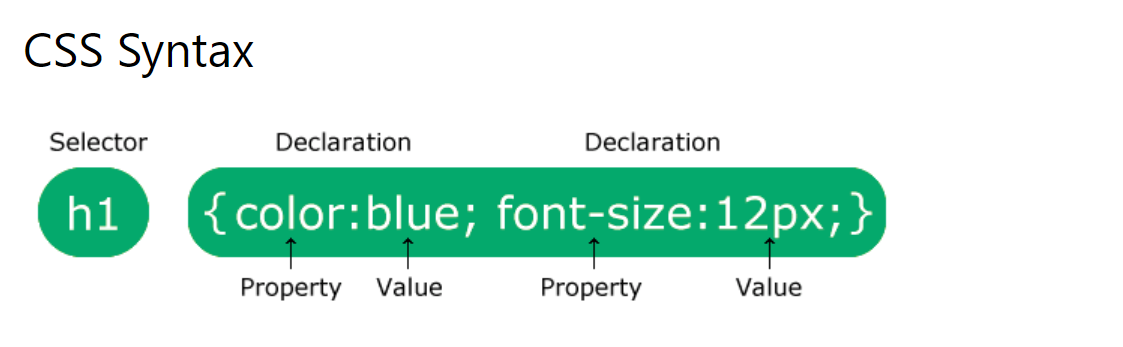
CSS code Syntax Errors
Syntax errors in CSS code can prevent styles from being applied correctly or cause unexpected behaviour on your website. Here is a common syntax of CSS code.
Here are some common syntax errors you should watch out for:
- Missing Semicolons: Each CSS declaration should end with a semicolon (;). Forgetting to add semicolons can lead to syntax errors.
/* Incorrect */
h1 {
    color: red
}

/* Correct */
h1 {
    color: red;
}- Missing Curly Braces: CSS rules should be enclosed within curly braces ({ }). Forgetting to include curly braces will result in syntax errors.
/* Incorrect */
h1
    color: red;
}

/* Correct */
h1 {
    color: red;
}- Misspelled Properties or Values: Make sure that CSS properties and property values are spelled correctly. Misspelled properties or values will not be recognised by the browser.
/* Incorrect */
h1 {
    colr: red;
}

/* Correct */
h1 {
    color: red;
}- Incorrect Selector Syntax: Check that your existing css code CSS selector is properly formatted. Incorrect selector syntax can prevent styles from being applied to the intended elements.
/* Incorrect */
h1.color {
    color: red;
}

/* Correct */
h1 {
    color: red;
}- CSS Comments: Ensure comments are properly formatted using /* */. Using // for comments is invalid in CSS.
/* Incorrect */
// This is a comment

/* Correct */
/* This is a comment */- Unclosed Parentheses: Some CSS properties, such as rgba() or url(), require parentheses. Make sure that all parentheses are properly closed.
/* Incorrect */
h1 {
    color: rgba(255, 0, 0;
}

/* Correct */
h1 {
    color: rgba(255, 0, 0);
}
Frequently Asked Questions
It depends on your preference. A plugin might be easier for beginners but may use more server resources and make the website load slowly. More experienced users tend to add CSS directly to theme files.
Common reasons may include syntax errors in CSS code, specificity conflicts with existing styles, caching issues, or incorrect file permissions.
You can target specific pages by adding CSS within the WordPress Customizer’s “Additional CSS” section and using page-specific classes or IDs.
You can access CSS in a WordPress theme by navigating to “Appearance” > “Editor” in the WordPress dashboard and selecting the appropriate options like styles.
You can minify JavaScript and CSS in WordPress using Cloudflare’s plugin’s auto-minify option.