
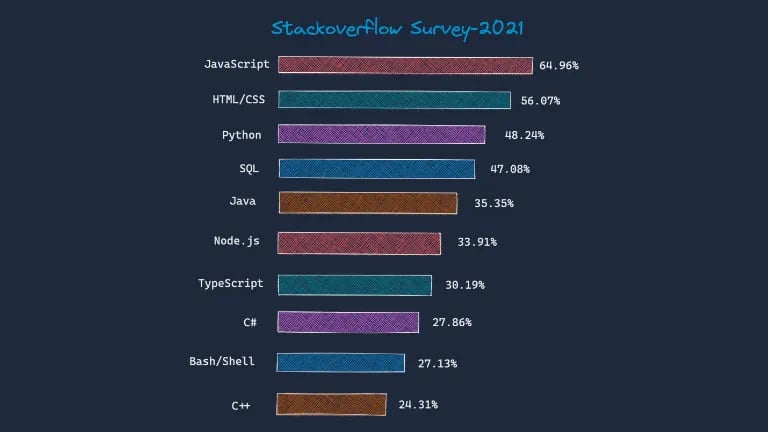
Per the data released by survey 2021 of Stackoverflow, HTML, CSS and JavaScript are the most popular languages used worldwide.
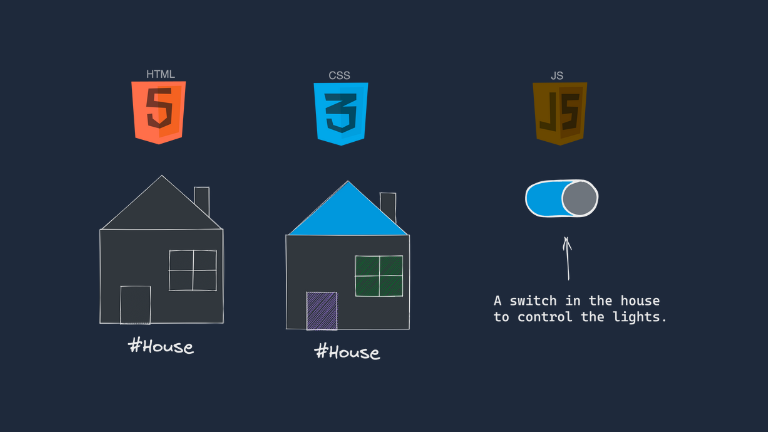
These three languages are the backbone of the web development; Without these languages, we can not imagine web development.
- HTML is used to build the basic structure of the web page.
- CSS is used to paint(design) that structure.
- JavaScript adds the behaviour to a web page.
See the diagram below.
Let’s start with each language and learn some basics about them.
HTML 🌎
HTML stands for Hyper Text Markup Language, in which most websites are written.
Here –
Hyper Text:- Where Hypertext refers to how documents (HTML documents) are linked together, the links available on a webpage are called Hypertext.
These links allow the reader to jump to other places in the document or to another document altogether.
Markup Language:- As HTML is a “mark-up” language, we use “mark-up” to represent text. This “mark-up” is processed by computer and presented to you.
For example:-
<h1>This is the Heading.</h1>
Here <h1> is the tag and Tags are used to “markup” the text.
Current version of HTML is HTML5.
HTML Editors ✍️ :-
HTML can be written in any text editor and we can save that file as example.html.
But the most preferable and widely used text editor is VS Code.
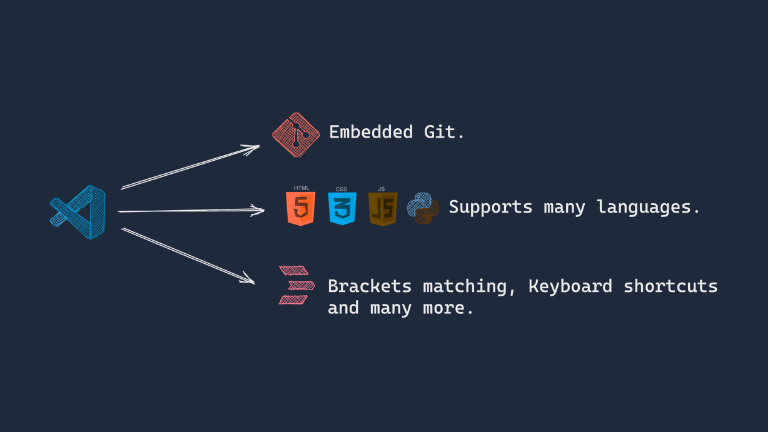
Why VS Code?🤔
Microsoft build VS Code with many features like syntax highlighting, autocomplete, debugging, etc.
See the image of the complete features of VS Code.
Online Editors 🖋 :–
There are so many online editors which are very helpful to write the code without setting any environment.
A web page using HTML 📄 :-
Let’s make a simple webpage using HTML so we can study some basics of it.
We will follow the below steps to make our webpage.
Step 1:-
Open VS Code, create a new file and save it as index.html.
Step 2:-
In this, we will write our HTML code.
<!DOCTYPE html>
<html>
<head>
<title>Page Title</title>
</head>
<body>
<h1>My Heading</h1>
<p>My paragraph.</p>
</body>
</html>
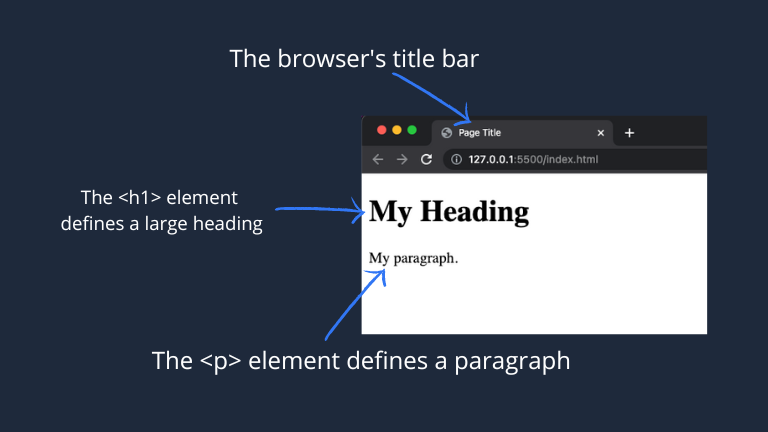
Step 3:-
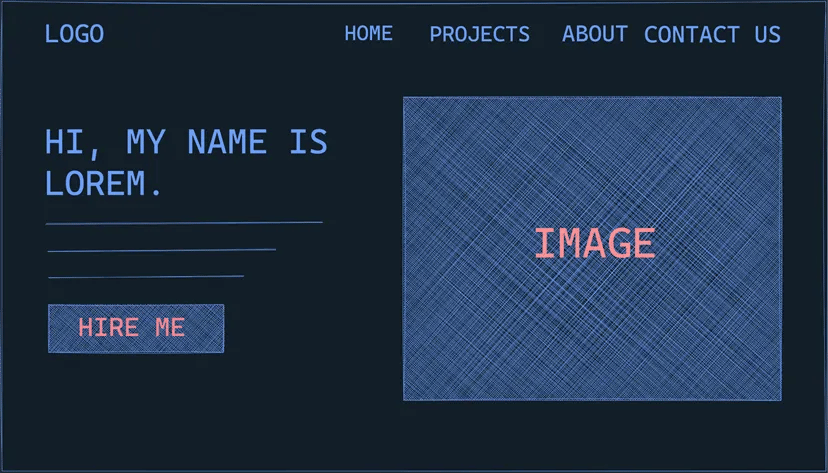
Run the code output will be a web page with a title, heading and paragraph.
See the image below to understand it more –
Congratulations 🎉 you have made your first web page.
Let’s discuss more about the above HTML code :-
Elements and Tags 🧑💻 :-
- Tags are used to markup the text, for example <h1>My Heading</h1>.
- Where <h1> and </h1> are the opening tag and closing tag respectively.
- Some HTML elements have no content (like the <br> and <img> element). These elements are called empty elements. Empty elements do not have an end tag!. They can be represented either by opening tag <tag> or <tag />.
Attributes :-
An Attributes contain additional information about tags.
for example <h1 class=”blue”>My Heading<h1>, The “class” is an attribute and “blue” is the value of that attribute.
HTML Styles 🖌 :-
The HTML style attribute is used to add styles to an element.
Styles can be color, font, border, size and more.
For example :-
<tagname style=”property:value;”></tagname>
Color property 🌈 :-
Color property of HTML changes the color of the fonts.
Example :-
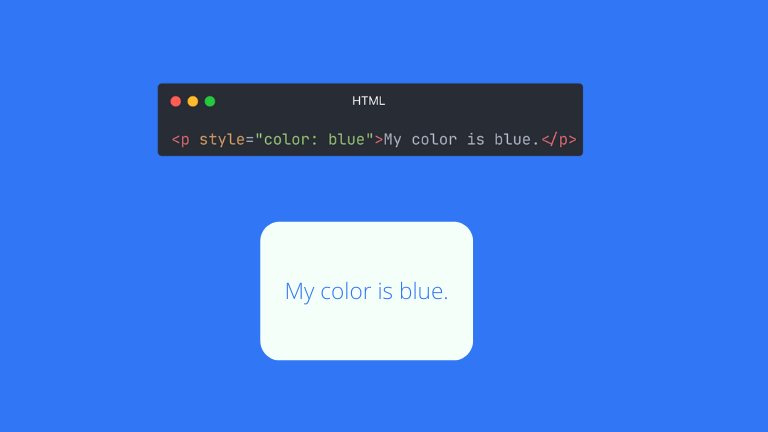
We can represents color either by color names, or with RGB, HEX, HSL, RGBA, or HSLA values.
Font Size 🔠 :-
We can adjust/change the size of HTML text by using font-size property of HTML.
For Example :-
<p style=”font-size: 20px;”>This is the paragraph.</p>
In the above example the HTML set the font-size of the paragraph element to 20px.
Mostly used units for HTML font-size are px, rem, em and %.
Writing many properties 🖼 :-
We can write any number of properties into the style attribute of the HTML.
For Example :-
<div class=”color: blue; font-size: 30px; text-align:center;”>I am a div.</div>
In the above example we have applied three properties to the div element of the HTML.
This is also called Inline style.
The lengthy inline style has some disadvantages like they make HTML code messy.
To avoid the disadvantage of inline style, we can make a separate styles in the style element inside the <head> element of HTML.
For Example :-
<!DOCTYPE html>
<html>
<head>
<style>
h1 {
color: blue;
text-align: center;
}
p {
font-family: verdana;
font-size: 20px;
}
</style>
<head>
<body>
<h1>My Heading.</h1>
<p>My Paragraph.</p>
</body>
</html>
Now we have slowly moved to CSS.
What is CSS? 🤔
- CSS is the language, used to style(design) the HTML document.
- CSS full form is Cascading Style Sheets.
- Using CSS we make our website responsive, Responsive means that the webpage can be displayed on different screens like mobile, tablets and Desktop.
- We can write CSS in the <style> element of HTML or we can make a separate file for CSS (also known as external style sheets) and then link that external file to our HTML.
- CSS is very powerful, We can add style(e.g.,fonts, colors, spacing) to Web documents.
Different ways to link CSS to HTML 🖇 :-
We can write and link CSS in three different ways, Those are
1. Inline :-
By using the Style attribute inside the HTML element.
<h1 style=”color: blue;”>Heading</h1>
2. Internal :-
By using <style> tag inside the <head> tag.
<!DOCTYPE html>
<html>
<head>
<style>
h1 {
color: blue;
}
</style>
<head>
<body>
<h1>Heading</h1>
</body>
</html>
3. External :-
By using the <link> element inside the <head> element.
The <link> element link the external CSS file to our current HTML document.
The rel attribute specifies the relationship between the current document and the linked document.
<!DOCTYPE html>
<html>
<head>
<title>My Document</title>
<link rel=”stylesheet” href=”style.css”>
<head>
<body>
<h1>Heading</h1>
</body>
</html>
Learn HTML and CSS by doing a Project 🎨 :-
Let’s learn more about HTML and CSS by doing a Project, we will make a Navbar section of a website design.
This project is the combination of a Navbar and Hero section of the website.Using these two section we will learn the following properties-
- Flex.
- Max-width.
- Margin.
- Padding.
- Box Model.
- Text Decoration.
Navbar 🧭 :-
A Navbar of a website generally consists of a logo (may be text or image) and different links of a website.
We have a semantic element for Navbar i.e <nav>.
Let’s write the structure of navbar using HTML.
<nav>
<div class=”logo”>
<a href=”#”>logo</a>
</div>
<ul>
<li><a href=”#”>home</a></li>
<li><a href=”#”>projects</a></li>
<li><a href=”#”>about</a></li>
<li><a href=”#”>contact us</a></li>
</ul>
</nav>
Step 1:-
In the first step, we will do some basic resettings. we do basic resettings so that the default properties set by HTML can be removed. Like HTML default padding or margin set to 0.
The CSS for basic resettings –
* {
margin: 0;
padding: 0;
box-sizing: border-box;
}
The Box Model :-
The Box model define our layout and design.
See the below image for the reference.
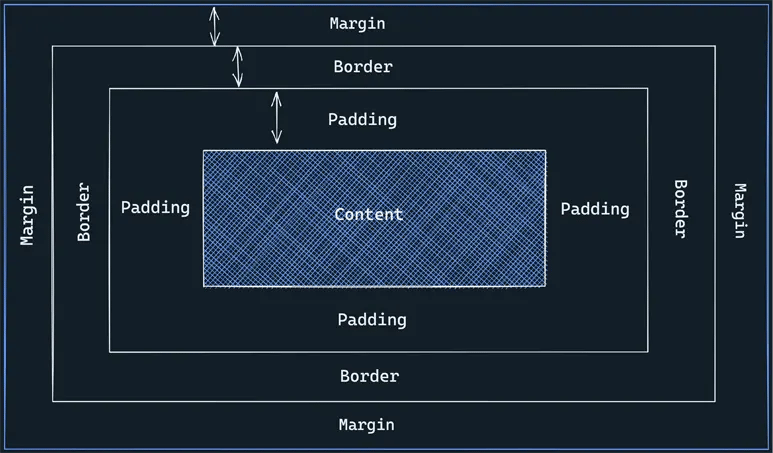
Different parts of the box model are –
- Content :- The content of the box, where our text, images, links and videos appear.
- Padding :- It is the area around the content. It is transparent.
- Border :- This the area around the content and padding.
- Margin :- This is the area outside the border. It is also transparent.
Total width of the element is calculated as –
Total element width = width + left padding + right padding + left border + right border + left margin + right margin.
Step 2:-
In this step, we will add styles to our nav element.
nav {
max-width: 1000px;
margin: auto;
display: flex;
justify-content: space-between;
align-items: center;
padding: 8px 16px;
}
Let’s discuss the properties from above code snippet.
1. The max-width :-
The max-width property specifies the maximum width of the element. If an element has smaller width than the max-width then the max-width property has no effect.
If the max-width is less than the width of the element than it automatically change the height of the element.
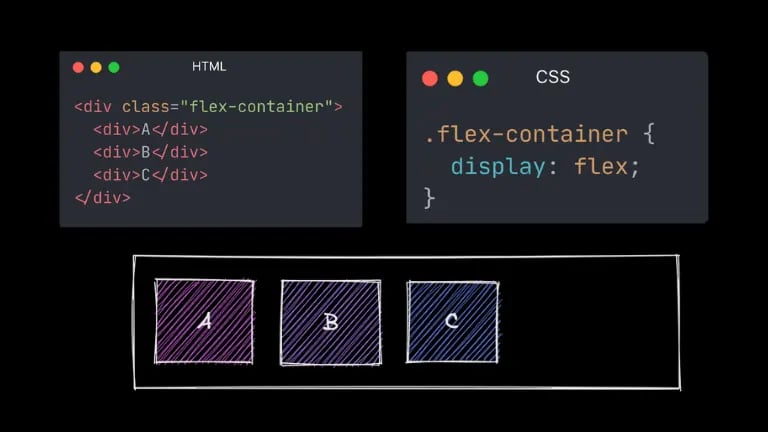
2. The flex property :-
One of the most important property of CSS is the flexbox.
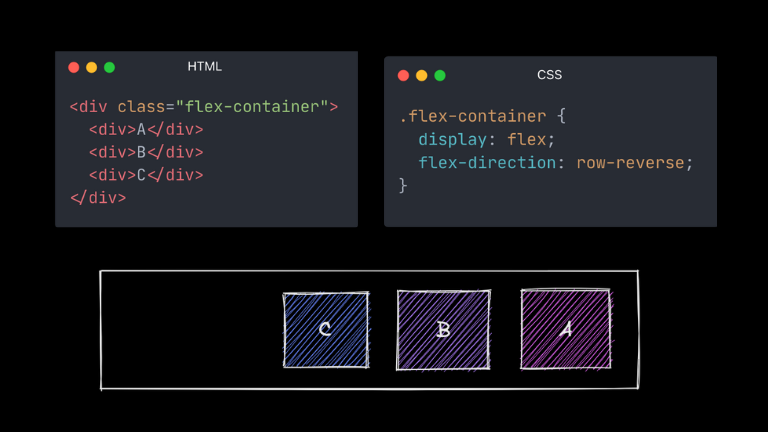
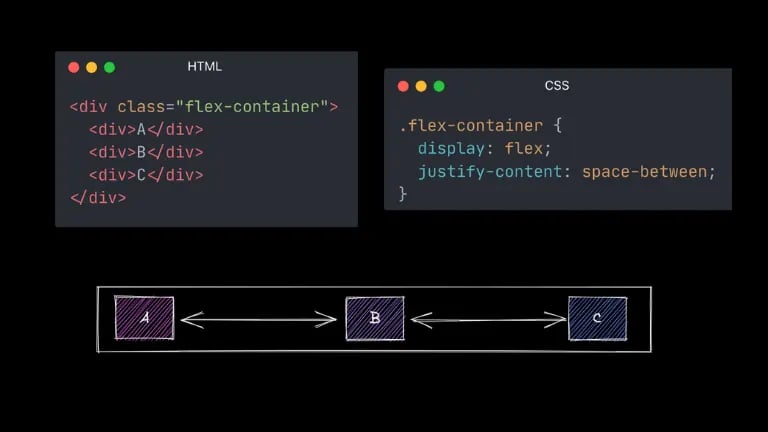
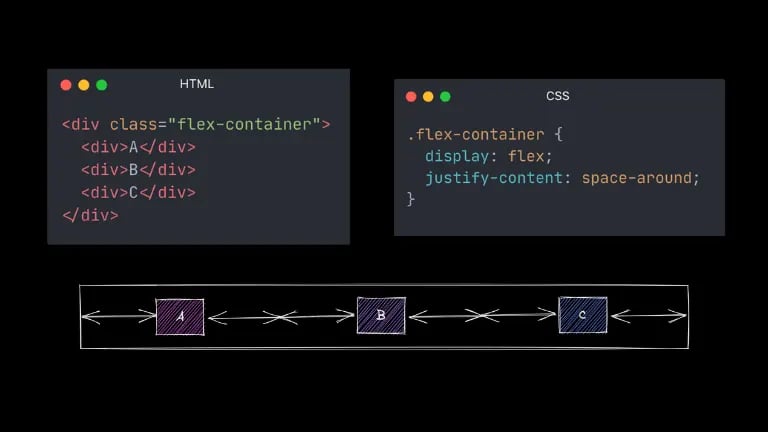
It makes complex layouts look simpler and it is very useful property for responsive web design.
Let’s learn some of the flex properties using images.
3. Margin and Padding :-
margin: auto – means that the browser calculates the margin.
padding: 8px 16px; – top-bottom padding is 8px and right-left padding 16px.
4. HTML lists and link tags :-
To make the nav link, we will make use of the unordered list of the HTML.
HTML is having two types of list –
- Unordered List
- Ordered List
1. Unordered List :-
An unordered list starts with the <ul> tag. Each list starts with <li> tag.
For Example :-
<ul>
<li>Eat</li>
<li>Sleep</li>
<li>Code</li>
<li>Exercise</li>
<li>Repeat</li>
</ul>
2. Ordered List :-
An ordered list starts with <ol>tag. Each list starts with <li> tag.
For Example :-
<ol>
<li>Eat</li>
<li>Sleep</li>
<li>Code</li>
<li>Exercise</li>
<li>Repeat</li>
</ol>
Let’s write the CSS for the nav bar.
/* CSS */
ul{
list-style-type: none;
display: flex;
}
li:not(:last-child){
margin-right: 10px
}
a{
text-decoration: none;
color: black;
text-transform: uppercase;
}
We have learned HTML and CSS.
What is JavaScript 🧑💻 ?
- JavaScript is the programming language of the web.
- Using HTML and CSS we can make the structure and design of a website. but to add behavior we need JavaScript.
- Today, JavaScript can execute not only in the browser, but also on the server, or any device that has a special program called the JavaScript engine.

1. Choosing Random name from the list of names :-
This code snippets will choose the random name, which will be helpful in situations like lucky draw.
HTML
<p id=”output”></p>
JavaScript
let x = document.getElementById(‘output’);
let names = [“John”, “Smith”, “Warner”, “Cummins”];
let rand = Math.floor((Math.random() * names.length));
x.innerText = names[rand];
➞ If you run the above program then output will be different every time.
2. Changing the Image on click of a button :-
➞ The below program changes the Image on the click of a button.
<img src=”https://images.pexels.com/photos/15286/pexels-photo.jpg?auto=compress&cs=tinysrgb&w=1260&h=750&dpr=2″ alt=”” id=”img”> <button onclick=”document.getElementById(‘img’).src=’https://images.pexels.com/photos/572897/pexels-photo-572897.jpeg?auto=compress&cs=tinysrgb&w=1260&h=750&dpr=2′”>Click</button>
We have seen the two practical examples of JavaScript.
Learning Web Development: From Basics to Full Stack
Full stack developers need to know back end technologies like Node.js, Python or Java and frameworks like Express.js or Django and databases like MySQL or MongoDB. If you want to build full web applications consider a full stack developer course. There are many online resources to get you started. Coursera, Udemy and Codecademy have structured courses for all levels while FreeCodeCamp has a hands on project based learning. Also you can find many tutorials and articles on YouTube channels and blogs about web development. there
Now let’s make a quick summary of the main differences between HTML, CSS and JavaScript.
Summary of Differences between HTML, CSS and JavaScript
- HTML is used to make a website structure, CSS is used to design(paint) that structure while JavaScript is used to add behaviour..
- HTML is a markup language for creating web pages.
- JavaScript is used for DOM manipulation.
- Using JavaScript we can handle date and time.
- JavaScript can be used as client side language as well as server side language.
- HTML has inbuilt form validation attributes that can validate the form but we can also validate the form using JavaScript.
- For CSS we use the style tag. <style>
- For JavaScript we use the script tag.
- An error in JavaScript can stops the execution of a webpage.
- An error in CSS would not effect the entire web page.
- An HTML files are saved as .html extension, The CSS files are stored as .css extension and the JavaScript files are stored as the .js extension.