WordPress powers 43% of all websites on the internet, yet plenty of people still get stuck on the basics. If you’re staring at your WordPress dashboard wondering where to click first, you’re not alone. We’ve helped dozens of clients navigate their first blog uploads, and the process trips up even tech-savvy professionals.
Video Tutorial: WordPress Blog Upload Walkthrough
The video will demonstrate the step-by-step process covered in this article, showing actual screen recordings of the WordPress dashboard, editor interface, and publishing workflow.
What Actually Happens When You Upload a Blog Post
WordPress treats your blog post like a document in a filing cabinet. You create the content, assign it to categories (think folders), add tags (think sticky notes), and WordPress stores it in your MySQL database. The platform then generates a URL based on your permalink settings and makes the post available to visitors.
Your hosting server handles three main tasks during this process. First, it stores the text content in database tables. Second, it processes any images through PHP’s image manipulation libraries. Third, it updates your site’s RSS feed and notifies ping services if you’ve enabled them.
The WordPress editor itself comes in two flavors. The Block Editor (Gutenberg) launched in 2018 and works like building with Lego blocks. The Classic Editor mimics Microsoft Word. Most hosting providers default to Gutenberg, though 5 million sites still actively use the Classic Editor plugin.
How to Upload Your First Blog Post
Step 1: Access Your WordPress Dashboard
Start by logging into your WordPress admin area. Type your domain followed by /wp-admin (example: yoursite.com/wp-admin). Use the credentials your hosting provider sent when you installed WordPress.
Step 2: Create a New Post
Click “Posts” in the left sidebar, then “Add New.” WordPress immediately creates a draft and starts auto-saving every 60 seconds. This draft exists in your database even before you type anything.
Step 3: Write Your Content
The title field accepts up to 255 characters, though search engines typically display only 50-60. Type your headline directly into the “Add title” field at the top.
For the main content, click below the title to start writing. Press Enter to create new paragraphs. The plus icon adds different content blocks – paragraphs, headings, images, videos, or embed codes.
To add headings, type /heading and select your level (H2, H3, etc.). WordPress automatically creates a table of contents if you use proper heading hierarchy, which helps both readers and search engines understand your structure.
Run your content through Grammarly before publishing. The free browser extension catches spelling mistakes, grammar errors, and punctuation issues that spell-check misses. The premium version flags clarity problems and suggests stronger word choices. Even professional writers miss typos when reviewing their own work – Grammarly acts as your second set of eyes.
Step 4: Add Images

Click the plus icon and select “Image.” You have three options:
- Upload: Select files from your computer
- Media Library: Choose previously uploaded images
- Insert from URL: Link to external images
WordPress generates four image sizes automatically:
- Thumbnail (150×150 pixels)
- Medium (300×300 pixels max)
- Large (1024×1024 pixels max)
- Full Size (original dimensions)
Your theme might create additional sizes. WooCommerce sites, for instance, generate product-specific dimensions. Check Settings > Media to see your current configuration.
Name your image files descriptively before uploading. “DSC_0234.jpg” tells search engines nothing. “chocolate-chip-cookies-recipe.jpg” helps your SEO. Fill in the Alt Text field – screen readers depend on this for visually impaired users.
Step 5: Set Categories and Tags
Categories organize your content hierarchically. A food blog might have “Recipes” as a parent category with “Desserts,” “Main Dishes,” and “Appetizers” as children. Most sites need 5-10 categories maximum.
Tags describe specific details within posts. That dessert recipe might include tags like “chocolate,” “gluten-free,” or “30-minute meals.” Unlike categories, tags don’t have hierarchy.
Find these options in the right sidebar under “Post” settings. If you don’t see the sidebar, click the gear icon in the top right corner.
Step 6: Configure SEO Settings
Install Yoast SEO or Rank Math if you haven’t already. These plugins add fields below your content editor for meta descriptions and focus keywords.
Write a meta description between 150-160 characters. This snippet appears in Google search results below your title. Include your target keyword naturally – stuffing keywords actually hurts rankings since Google’s RankBrain update.
The URL slug (permalink) generates automatically from your title. Edit it to remove stop words like “a,” “the,” or “to.” Keep slugs under 5 words when possible.
What Makes WordPress Different from Other Platforms
WordPress stores content differently than website builders like Wix or Squarespace. Your posts live in a MySQL database, not as individual HTML files. This database structure lets you display the same content in multiple formats – your homepage, category archives, and RSS feeds all pull from the same source.
The WordPress REST API, introduced in version 4.7, allows external applications to interact with your content. Mobile apps, desktop publishers, and even other websites can push content to your WordPress site programmatically.
Custom Post Types extend beyond traditional blogs. WooCommerce uses them for products, portfolio plugins create project showcases, and event calendars manage schedules. The same upload process applies, just with different fields and taxonomies.
How to Schedule Posts for Future Publication
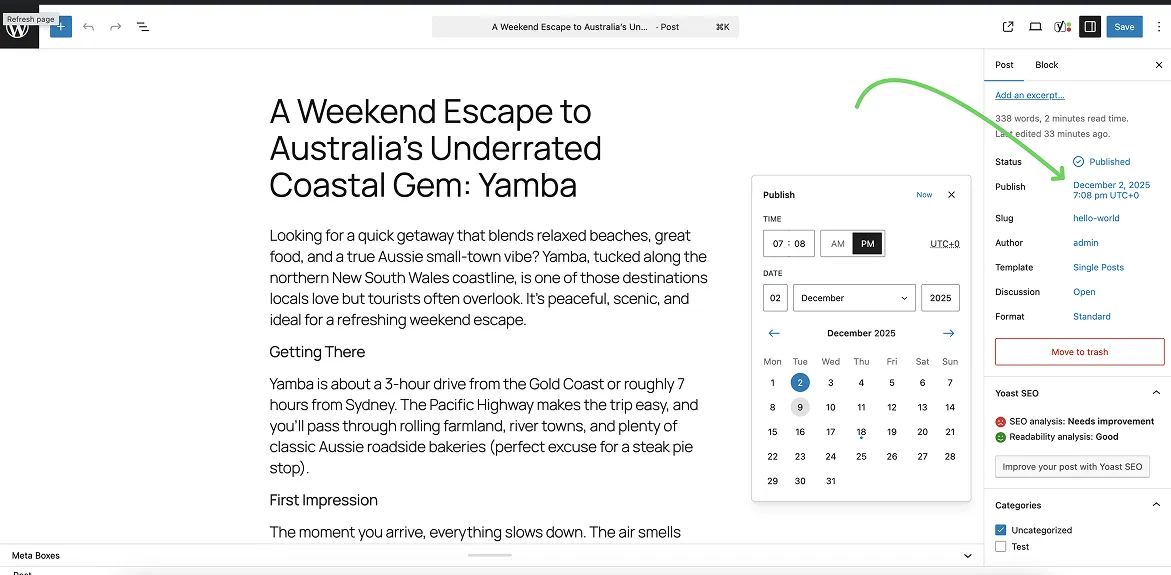
The Publish panel (top right) defaults to “Publish immediately.” Click the date link to access scheduling options. Select your preferred date and time, then click “Schedule” instead of “Publish.”
WordPress uses your timezone setting (Settings > General) for scheduling. Australian users should select their specific timezone – Sydney/Melbourne (AEDT/AEST), Brisbane (AEST), Adelaide (ACDT/ACST), or Perth (AWST). If you set 9 AM but your timezone shows UTC, your post publishes at 9 AM Greenwich Mean Time, not your local Australian time.
Scheduled posts appear with a blue “Scheduled” status in your Posts list. WordPress runs wp-cron to check for scheduled content every time someone visits your site. Low-traffic sites might need a real cron job through their hosting control panel for reliable scheduling.
Why Your Upload Might Fail
The most common upload failure comes from exceeding your hosting plan’s limits. Shared hosting typically restricts:
- PHP memory limit (usually 128-256MB)
- Max upload size (2-64MB)
- Max execution time (30-300 seconds)
Contact your host or check your cPanel/hosting dashboard for these values. VentraIP’s basic WordPress hosting limits uploads to 128MB. Crucial’s Business plan allows 512MB on their Sydney servers.
Plugin conflicts cause the second-most upload issues. Deactivate plugins one by one if your uploads suddenly stop working. Security plugins like Wordfence or Sucuri sometimes block legitimate uploads they consider suspicious.
Browser problems occasionally interfere. Clear your cache and cookies, or try a different browser. Chrome’s developer console (F12) shows JavaScript errors that might prevent uploads.
When to Use Alternative Upload Methods
The WordPress mobile app (iOS and Android) works offline and syncs when you reconnect. Perfect for writing during commutes or flights. The app handles images differently though – it compresses them more aggressively than desktop uploads.
Desktop publishers like MarsEdit (Mac) or Open Live Writer (Windows) connect through XML-RPC. These tools excel at bulk uploads and working with multiple WordPress sites simultaneously.
Email posting still exists in WordPress, though few people use it. Configure it under Settings > Writing. Send emails to a secret address, and WordPress converts them to posts. Useful for posting from devices that can’t access your admin area.
Is WordPress the Right Platform for Your Blog?
WordPress makes sense if you want complete control over your content and hosting. You own your database, choose your server location, and can export everything whenever you want.
The learning curve beats hiring developers for every change. Basic tasks like uploading posts take minutes once you understand the interface. Advanced customization remains possible through 60,000+ plugins and thousands of themes.
Cost-wise, WordPress itself is free. Budget $5-15 monthly for shared hosting (VentraIP, Crucial, Netregistry), $30-80 for managed WordPress hosting (WP Engine Australia, Pantheon), or $10-40 for a VPS (Binary Lane, Vultr Sydney) if you’re technical.
Skip WordPress if you need immediate simplicity. Medium, Substack, or Ghost offer cleaner interfaces with fewer options. You sacrifice flexibility for convenience – a worthwhile trade for many casual bloggers.
Making Your Uploads Work Better
Local Hosting
Consider local hosting for better performance. Australian visitors load Australian-hosted sites 200-400ms faster than overseas hosting. VentraIP, Crucial, and Digital Pacific all run data centers in Sydney and Melbourne. This speed difference matters for SEO – Google prioritizes fast-loading sites in local search results.
XML Sitemaps
Enable XML sitemaps through your SEO plugin. This file tells Google about new posts immediately instead of waiting for crawlers to discover them naturally.
CDN (Content Delivery Network)
Set up Cloudflare or another CDN to serve images from servers worldwide. A reader in Brisbane shouldn’t wait for images to load from your server in Perth. Cloudflare has Sydney and Melbourne points of presence that significantly speed up Australian sites.
Image Sizes
Compress images before uploading. TinyPNG, Squoosh, or ImageOptim reduce file sizes 50-80% without visible quality loss. The EWWW Image Optimizer plugin handles this automatically after upload.
Consistent Posting
Create a consistent posting schedule. WordPress’s editorial calendar plugins like CoSchedule or Editorial Calendar help visualize your content pipeline. Readers and search engines both reward consistency.
Backup
Back up your content at the server level through cPanel instead of adding another plugin to your site. Most hosting providers offer automated daily or weekly backups through their control panel. In cPanel, look for “Backup Wizard” or “JetBackup” – these create complete server snapshots including your database and files. Server-level backups run faster, don’t slow your site, and restore easier than plugin-based solutions. Download monthly backups to your local computer for extra security. Contact your hosting support to enable automated backups if they’re not already active – many hosts include this free with their plans.
Traffic Tracking
Remember that uploading is just the beginning. Monitor your Google Analytics to see which posts resonate. Update old content when information changes. WordPress makes editing published posts as simple as creating new ones – just click “Edit” from your Posts list and republish when ready.
The 15 minutes you spend learning WordPress’s upload process saves hours of frustration later. Most professional bloggers still use WordPress for good reason. Once you understand how uploads work, you’ll appreciate the control and flexibility no other platform matches.